Rhizomes are plant stalks which spread underground. Rhizomes mimic artistic growth — we must continuously create space for processes to expand within us until a new stalk pushes up somewhere, surprising us with new growth. This can occur with startling regularity.
In my first post about sketchbooks, I briefly addressed the WHY of keeping a sketchbook. In Part 2, I offered some thinking about ink and what the sketchbook has taught me about working with related materials. I am saving a discussion of graphite for another time.
This post, Part 3, responds to requests to detail my favorite method of binding a sketchbook.

In the photo you’ll see essentially a cased-in book but built eccentrically so that it feels, for all initial sensation, to be an abnormal binding. Some refer to my take as a neo-Bradel. However a few judicious cuts and tugs on the end leaf sections and the whole business comes away, revealing the case-like nature.
My reason for this stylistic approach is simple: I like how this form looks. Also, I am fond of conserving materials, piecing parts like a quilter or additive sculptor might, but that is not the overt goal. The aim is a very cool book. How to get that when very common forms dominate the field?
A quarter binding is a very basic form and goes the distance for meeting “regular” bookbinding needs for most ordinary books. But we are not dealing with convention and tedium. On the other hand, a full-blown all-stops-out material binding, in paper, leather or cloth, opens evocative, graphic possibilities that are so much more receptive to imaginative possibility than any basic quarter or half binding can ever be.

One guy I know says this about quarter bindings, “its a killer for design.” And I agree. The quarter and half bindings may conserve materials, but I think they tend to be dull — especially when done as a Victorian pastiche. We see the quarter binding often because it functions effectively as a traditional “given” in the book trade and it works okay.
The quarter binding also seems symbolic for its historical representation of a mind-set for a modern book. Most of what we do technically in bookbinding IS an extension of Victorian bookbinding practices.

So my favorite approach achieves some of both — a look resembling a full leather fine binding for graphic possibilities. My version still IS a quarter binding, though I refer to it as a “triad.” It uses a dorsal covering of one material, usually leather, but I use the boards to fully cover the leather edges which project out, adhered, onto the first leaf. The boards themselves are covered, in this case with treated paper, and the entire painted board area is exposed to the world — the left edge of the book face no longer loses a quarter of its span to spine covering material.
To recapitulate: This method is a quarter binding. The leather shoots under the covered board, exposing the total board surface as an expressive plane. Inside the boards is a full surface of silk/poly blend bookcloth. Adhesives integrate the layers like lasagna eliminating much of the shear action.
My regulation sketchbook, which I teach in master classes, does employ a version of the quarter structure; a push-up, cloth-covered spine-ware, a flat back, and paste medium papers form this version. This is an important place to start. So much can be conveyed through this first-principal bookbinding practice. All the requisite learning needs seem to be met. Learning the subtle bits about folding, cutting, measuring, refined sewing and all the rest is vital if one is to move into the scary bits. The goal is for the form to ultimately be sublime. Once those learning curves or curses are under control or mastered, the advanced designs are seemingly easy. Sublimity is then manifest.
In my own work I explore and rehearse binding methods — practicing the moves that more ambitious books demand. I occasionally make a sketchbook that is more ambitious as a way to achieve this. The practice keeps my hand in and really is an excellent place for experiments as it is not too serious.
Let me detail my triad/quarter book as it models many of the weird things I do. In my inventory of binding methods, this leitmotif occurs in 6 variants that I use. I count this one as N˚ 4.
 In the example, the paper used for drawing is a common Strathmore drawing paper. In its plane-like flat sheet form it represents a set of massive possibilities. I would suggest “infinite” but that’s rather a lot of things to grasp. I prefer “limitless,” for when you get to the edge of the earth there is always more earth. Either way, blank paper often intimidates us. So in this book I hexed the possibilities by adding preliminary markings both visually and structurally. I’ll expand on this further along.

The sections themselves were folded down and almost cut through. I like the number 64, as it references the I Ching, and so my sketchbooks normally are 8 sections of 8 pages and, as this variant structure requires it, there are additional endpapers. The result has 64 pages plus the structural bits, waste sheets, endpapers and so on. In this form, the first and last leaves are integrated as the paste downs. This only conceals 2 sides of a leaf — colored, decorated or not — to the binding. Sixty four pages, or leaves, yields up a book that will take about two months to fill.
For this jaunt, I added 2 endpaper sections with a cloth joint. The cloth joint, normally a narrow strip of cloth is, in this case, a board-sized piece of Japanese book cloth sewn in with the rest of the end sheet section and protected by a later-to-be-removed waste sheet. (Note that when sewing on this endpaper it is important to angle the needle downward so that when the book opens the sewing is not revealed.)

All my usual eccentric aggregates and other “concept” prompts were added before any structural fabrication began. These took the form of stamps, stenciled-in forms and transfers and some other set ups. I added them so when I reach a new page I do not feel the intimidation of the blank page but have reached a cozy new page that exhibits markings already. Otherwise, binding this book was very straight forward.
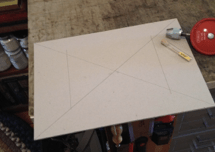
I marked this book up for sewing using a one-point perspective gradient. My plan was to sew onto 4 small recessed cords with the thread passing over the narrow gauge cord and drawing it into the tiny recesses — the saw kerfs. One of my teachers, Daphne Beaumont-Wright, always said this was ‘’a vile trade practice.’’ I don’t believe that it is.
What I find is that this method makes for a cord-to-thread ratio that is advantageously flexible. I also like that the recesses are revealed on the inside, though they are NOT deep, and provide pivots for guide lines inside the book as well as other departures for my drawings. This approach is akin to sewing on tapes but one hole is used rather than two and a small coil twist of excellent cord makes it all work.
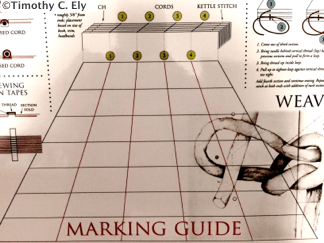
So the book I made is very pliant and integrally functional. It is extremely strong for all it is, perhaps marginally less so than had I used a raised cord but it also lacks the stiffness and the strangulation of the back twist. In the raised cord method the cord is wrapped spring like and is demonstrably less pliant. The recessed cord, by simply passing over and not wrapping the cord [same with a tape sewn book] simply bends over backwards to accommodate the action of the book. Clear as a bell right?
Once sewn, the book was glued up. Prior to gluing, I worked with a clean folder to close up the sewing holes and to flatten the radius of the sections so that the adhesive formed a film skin across the sections without overly penetrating beyond the folds and into the book. It’s beautiful! The book was then rounded and backed, trimmed on 3 edges and this time edge decoration was omitted for brevity. Two linings of aged Gampi and PVA stabilized the spine. Following this, a special hollow was made integrating a headcap former.
Leather, a thin tawny pigskin, was pared a bit at the head and tail and pasted to the hollow and turned in.This unit was then pasted up on the edges only and carried down onto the waste sheet over the shoulder. Headcaps were formed. Some work with a folder secured this part and finally pressing with clean boards assured a reasonably sharp crisp edge.
Back a million years or so, I was introduced to the concept of THE IDEAL AND THE REAL. This simply means that a notion held in the mind is complete and “idealized.” An architectural rendering only suggests in beautiful and yet vague terms how a finished building will actually look. It can be seen as the distinction between the thought reality and the physical reality.
I wasn’t around, but someone that was there mentioned that Plato said this. A form, let’s say an icosahedron, is beheld in the mind and this form is perfect. As soon as I or anyone begins to build one, the physics and the physical show up. The welds are visible, the joints and seams are vivid reminders of construction and suddenly a sum of inelegant parts and fabrication techniques intrudes on the scheme.
 I have so many times imagined a thing as a concept or drawing only to begin construction and find that there are areas of mass that I didn’t anticipate. Material has weight or thickness — it’s 3-D not 2! Building the thing changed it and it became real. The “reality” is a materials consideration for sure.
It follows then that the materials of bookbinding are an incredible challenge to the ideal. There is compromise and reconciliation. I will design something and so often overlook the squishy nature of leather or paper, how it reacts to heat and moisture and that most all of this stuff stretches. I love that we use bone age and stone age tools to do the work.
My point is, when I design in a sketchbook, I begin with idealized forms and abbreviated outlines or strings of an outcome. It can be the same with a plan for a painting or a book structure or a shelf or a loaf of bread. It is not solid in the world until it is. And then, somehow, the idea becomes condensed and all sorts of other considerations begin to assert themselves as well.

Dowel provides strength for board pair
Hand drill created hole for dowel
I am most always after several results: development of the object, an advancement of skills and at the same time an opportunity to see what is connecting it all. We should love the adventure of poking around in the tide pool of experiment and experience to see what shows up. Unfortunately, there is also a tightrope over the tide pool on which we must walk delicately. But back to our story…
For my sketchbook, the boards were prepared from pairs of thin Belgian board. Each of the 4 boards was cut and sanded then each pair was laminated with a layer of decent paper between the boards — all with glue not PVA**. When dry, the board pairs were pegged for stability with 5 small wooden dowels, holes for which were drilled with a N˚16 bit. (A hand drill was used.) The dowels were sawn off and sanded smooth — no lumps. The board edges were lightly sanded and ever so delicately rounded off. I also treat the corners of the board with wood glue [aliphatic resin] so they are quite hard and resist being crushed.

When all was dry, the boards were covered with a decorated or primed paper, corners mitered and the inside area infilled with paper to match the outside. They were put into a press and given time to dry. Next, a mix of very well cooked and cooled starch paste with some matte medium was applied to the outside of the whole board. The aim was to balance all of the various forces. The center paper and the pegs go a long way towards keeping the thing flat. This mix also protects the paper and gives me a surface preparation which enhances the “take” of my drawing materials.
Along the way I tested the board fit against the covered leather spine so that the board in no way rode up above the leather covered shoulder. I spent the morning beveling both of those edges lower than you would think you need. As a book relaxes and gets used, the tires wobble, so it paid to go a bit thinner on the back edge.
The surface coating was now really dry. The paste and polymer medium combo made the surface receptive to both drawing materials and to some foil stamping before I finally waxed and boot polished the whole thing.
The sized pigskin was treated with paste and, given that the spine was curved, I used hand tools to put the volume number and some other arcane markings on the spine as well. Fast and funky. (On flat books, I use a hot stamping press.)
Zuma, Nemo, and Michelangelo
The last step was to install the boards. I love this board making and attachment method because I am able to work on the boards away from the book before installation. Drilling, sanding, blasting, spraying and rivet installation among others is allowed by the process.This is an old idea which I think Philip Smith devised and developed — the Tongue/Slot board structure. My method doesn’t hold to that description completely, as the board was not slotted. Instead it was adhered to the end leaf which was, in this case, Japanese book cloth. This last step is always a place where things can go wrong. So I locked the cats out of the studio, killed the phone and made sure, as much as I could, that all was ready.
Starch paste was prepared fresh, cooled some. The waste leaf was carefully torn away and a layer of paste was applied to the leaf and to the board. This was then given a minute to set up and relax. A second coat was applied and the board carefully fitted up to the shoulder in alignment with the headcaps. Dropped into place and given a light press (don’t want the adhesive to mayonnaise out), the board was gently lifted an inch or so and a pressing tin inserted. The whole book was then placed into a press and given a firm up for about 15 heartbeats…pressure was released but the book left firm for ten minutes in the press. I removed and repeated for the B side — being certain that the the head alignment was perfect. Finally, the whole book was set up with tins, which in this case were not metal but various kinds of thin plastic. This kept the moisture from migrating. The book was sort of firmly pressed but not really. It was comfortably numb but not crushed. I left it overnight.

The sketchbook was complete.
Although many of these methods are employed for my formal books, the environmental considerations are somewhat different.
My formal books, once they reach a new destination, rarely move about and if so, are under great care. They are boxed in bulletproof containers. Special Collections are not casual dining joints and I have confidence that my work is well gandered and not misused. They don’t erode or evolve the way the sketchbooks do.
My sketchbooks though, go into a bag and travel. They are pulled out, worked in and are in physical action until they are filled. Any regulation book or circulating library book takes on the effects of being read. This is the nature of the object and it is difficult to stave off the effects of entropy. It will always be observed that the book takes on its own scars and marks and love bites.
I want my sketchbooks, all my work really, to have that capacity for a long life. A well-made book can also be generational and ought do its job for a long time. To achieve this only requires care and attention. Decent material and attention paid to the right places and beguiling surfaces should take me where I want to go.
Footnote: **Whenever glue is mentioned, unless noted as PVA, it is a collagen glue or animal glue or hide glue — a natural product with a long history. Paste is always flour paste unless mentioned as wheat STARCH paste.
©2018 Timothy C. Ely – All Rights Reserved

Thanks so much for the glimpse into the working and making!
LikeLike
You are very welcome!
LikeLike
Pingback: Byopia Press 2018 Advent Calendar: Day Nine and a Menko Card | Byopia Press